

Acknowledgements
![]()
MedDRA® trademark is owned by IFPMA on behalf of ICH.
Copyright 2015 International Federation of Pharmaceutical Manufacturers and Associations. All Rights Reserved.
![]()
![]()
APPENDIX A. MEDDRA DESKTOP BROWSER FEEDBACK FORM 49
Figure 2-1. Import MDB Screen 2
Figure 2-2. Import MDB Screen with Selected Data File 2
Figure 2-3. Main MDB Screen Populated with MedDRA Terminology 3
Figure 2-4. Import MedDRA Files 3
Figure 2-5. Import MDB Screen 4
Figure 2-6. MDB Preferences Menu 4
Figure 2-7. Changing User Interface Preference 5
Figure 2-8. MDB with the Chinese User Interface 6
Figure 2-9. Selecting multiple languages at start up 6
Figure 2-10. Removing MedDRA Files 7
Figure 2-11. Selecting Files to Remove 7
Figure 2-12. Adjusting the MDB Interface 8
Figure 2-13. MDB with the configuration panel removed 8
Figure 2-14. Restoring Panels 9
Figure 3-1. Components of the MDB Screen 1
Figure 3-2. MDB Configuration Options 2
Figure 4-1. MDB Search Screen 4
Figure 4-2. MDB Search Results 5
Figure 4-5. Search Results Panel Features 7
Figure 4-6. Go to Browser Results 8
![]()
Figure 4-9. Select SOC to Search 9
Figure 4-10. Select Multiple SOCs to Search 10
Figure 4-11. SMQ View Option 10
Figure 4-13. Search SMQ Term Codes 12
Figure 5-1. Export Search Results 13
Figure 5-2. Search Results Display 14
Figure 5-3. Selecting Multiple Languages 15
Figure 5-4. Search Results in Multiple Languages 16
Figure 5-5. Search Language Option Menu 17
Figure 5-6. View Specific Language Synonym List 18
Figure 5-7. Chinese Translation Synonym List 18
Figure 5-8. Ignore Diacritical Marks 19
Figure 5-11. SMQ Analysis Options 20
Figure 5-12. SMQ Analysis Input Data 21
Figure 5-13. SMQ Analysis Report 21
Figure 5-14. Hierarchy Analysis Options 22
Figure 5-15. Hierarchy Analysis Inputs 23
Figure 5-16. Hierarchy Analysis Report 24
Figure 6-2. Open History Results 25
Figure 6-4. Open Details & Occurrences 27
Figure 6-5. Term Details in Primary Language 28
Figure 6-6. Add to Research Bin 29
Figure 6-7. Add Multiple Groups to Research Bin 30
Figure 6-8. Remove Terms From Research Bin 30
Figure 6-9. Add Sub-categories to Research Bin 31
Figure 6-10. My Research Bin 32
Figure 6-11. Research Bin Label 33
Figure 6-12. Export Spreadsheet 33
Figure 6-13. Import Previously Exported Spreadsheet 34
Figure 6-14. Imported Terms Results 35
Figure 6-16. Include Inactive Terms 36
Figure 6-17. SMQ Export Spreadsheet 37
Figure 7-1. Select Language Option 38
![]()
Welcome to the MedDRA® Desktop Browser (MDB) User Guide. This guide has been developed to familiarize the reader with the use of the MedDRA Desktop Browser.
The MDB is designed to review the MedDRA hierarchy and SMQs, and perform term searches for coding and analysis tasks in English and available translated languages.
This guide assumes the viewer has a basic understand of how MedDRA is used for regulatory reporting and analysis, and knowledge of MedDRA’s hierarchical structure.
All examples given in this manual utilize MedDRA Version 22.0. This guide assumes you have stored the MedDRA data files on your hard drive or local area network. If you do not have access to the data files, please contact your system administrator.
The MedDRA Desktop Browser 4.1 has been developed using the Microsoft Windows® .Net™ 4.0 platform. The MedDRA Desktop Browser has been developed to be compatible with Windows® 7 and above. It was tested using the U.S. version of Windows 10. If the reader uses the MedDRA Desktop Browser with other versions of Windows and experiences any difficulties; please contact the MSSO (internationally) via a toll-free number listed below.
For more information about the MedDRA Desktop Browser, questions, or comments about this guide, please contact the MedDRA MSSO at:
Toll Free International: +1 877.258.8280
Direct: +1 703.556.2950
Fax: +1 703.556.1744
The MedDRA Desktop Browser 4.0 has the following enhanced features:
The user interface has been modified to match the Web-Based Browser
Users have the option to change the user interface language to any of the currently supported MedDRA languages
Search results are grouped by default into four search categories for easier review
– exact match, lexical variant, synonym and contains search results
Users may view up to three languages at one time
Search results will display in multiple languages, if selected
Hierarchy information is included with research bin and search results exports
The synonym search results has been enhanced from the 3.1.0b version
Access to on-line resources including the latest version of the MedDRA concept descriptions, MedDRA documentation and an html version of this user guide.
![]()
The desktop browser has been enhanced to take advantage of the unique features of Japanese MedDRA.
The MedDRA Desktop Browser 4.1 has the following enhanced features:
The user can perform SMQ Analysis and Hierarchy Analysis functions
The user has the option to perform a more complex search operation
Secondary SOC data can be extracted when exporting Research Bin, search results, and Hierarchy Analysis report
Data can be exported in all user-selected languages
The MSSO encourages users to provide feedback. This includes identification of software defects as well as suggestions for new or modified capabilities. Please use the MedDRA Desktop Browser Feedback Form in Appendix A. Your comments and suggestions are appreciated.
![]()
This section describes basic MedDRA Desktop Browser installation procedures and contains the following:
System requirements
Uninstalling previous MedDRA Desktop Browser
Installation procedures for running on an individual computer workstation
If your computer does not meet these requirements, please see your system administrator.
Before installing the MedDRA Desktop Browser, your system must meet the following minimum requirements:
Microsoft Windows 7 or greater
1 GB RAM
.NET 4.0 Framework
40 MB of room available on hard disk
If your computer does not meet these requirements, please see your system administrator.
MDB version 4.0 does not need to be removed or uninstalled to use MDB 4.1. However, users may remove version 4.0 by deleting the folder containing the executable file. Versions 3.0 and prior were bundled as an install package and can be uninstalled if desired. Follow the steps below to remove versions prior to 3.0 of the desktop browser.
Go to Start…Settings…Control Panel
Double-click the Add/Remove Programs icon
Highlight MedDRA Desktop Browser in the open list box
From the welcome screen options, choose Remove
A confirmation will appear. Choose Yes to uninstall the Browser.
The MedDRA MDB is a free tool that is part of your MedDRA subscription. Follow the steps listed below to download and install the MDB application:
Go to the MedDRA Desktop Browsers web page (MedDRA ID and password required)
![]()
Click on the Download link found in the right kiosk.
Unzip the MDB files to a folder on your PC.
Double click on MEDDRABROWSERWIN.exe. (Note: A shortcut can be created to the executable the desktop for convenience).
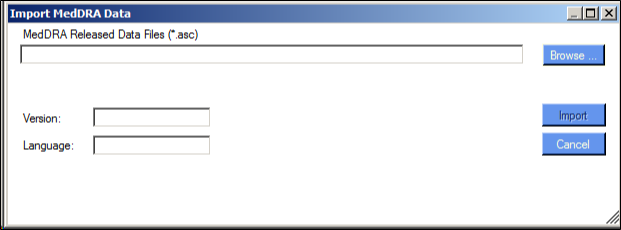
You will be presented with the Import MedDRA Data screen.
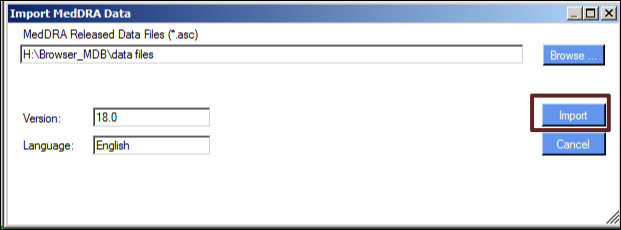
Make sure that the MedDRA release file is already unzipped in a folder. Unzipping the release file will require an Unzip Password which can be retrieved from the MedDRA Self-Service Application. Navigate to the directory where you store the MedDRA data files, select the data files folder, and press OK The Version and Language fields will be automatically filled in with the language and version selected. Press the Import button. The data files will be loaded into the MDB.
![]()
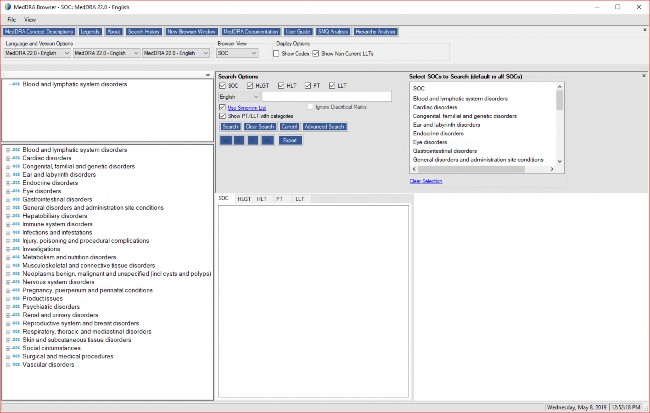
You will be presented with the main MDB screen populated with MedDRA Terminology.
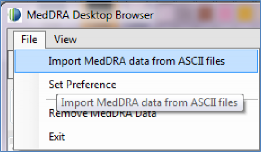
To load additional MedDRA versions into the MDB, select “Import MedDRA data from ASCII files” from the “File” menu.
![]()
You will be presented with the Import MedDRA Data screen.

Navigate to the directory where you store the MedDRA data files, select the data files folder, and press OK. The Version and Language fields will be automatically filled in with the language and version selected.
Press the Import button. The data files will be loaded into the MDB.
You will be presented with the main MDB screen populated with MedDRA Terminology. Repeat for additional versions and languages.
There are two preferences that can be set when working in the MDB. To access the preferences screen, select “Set Preference” from the “File” menu.
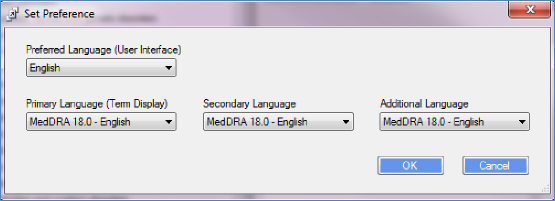
First, users may change the user interface language from English to one of the currently supported MedDRA languages. To do this, select a language from the “Preferred Language (User Interface)” drop down menu. See the item A in the figure below.
After clicking “OK” (language equivalent) – item B, the language interface for the MDB will change to the language selected. See the figure below for an example.

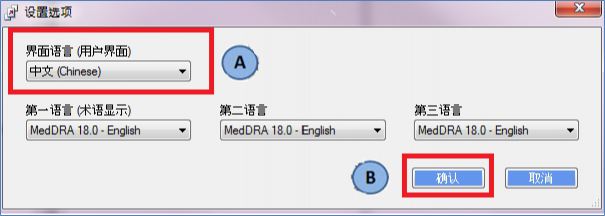
The second option available is setting which language versions to load when starting the MDB. Users may select up to three languages to load at startup which will appear in the hierarchy view of the MDB. See Section 5.2 for more information on viewing and searching in multiple languages versions of MedDRA.
![]()
There are two prerequisites for selecting multiple languages at start up. First, the language versions of MedDRA must be loaded into the MDB as described in Section
2.4. Second, all languages selected must be the same version. For example, if English, Dutch, and French are selected to load at start up, all three languages must be the same version (e.g., MedDRA Version 18.0).
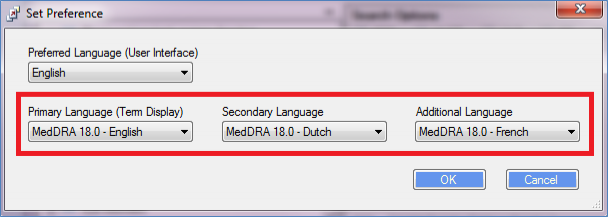
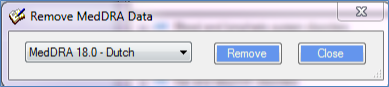
To remove previously loaded files, select “Remove MedDRA Data” as shown in the figure below.
Then select which language version of MedDRA to remove and click the “Remove” button as shown below. Files can be reloaded at any time using the procedure described in Section 2.4.
The MDB interface may be adjusted by removing panels to create more working space. Panels may be removed by clicking on “X” located to the right of the hierarchy, configuration options and search panels. See section 3 for a description of each panel in the MDB.
Clicking the “X” removes a panel.
To restore all panels, select “All” from the view menu.
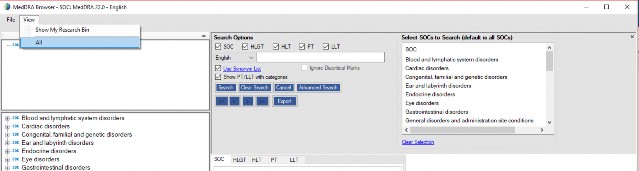
![]()
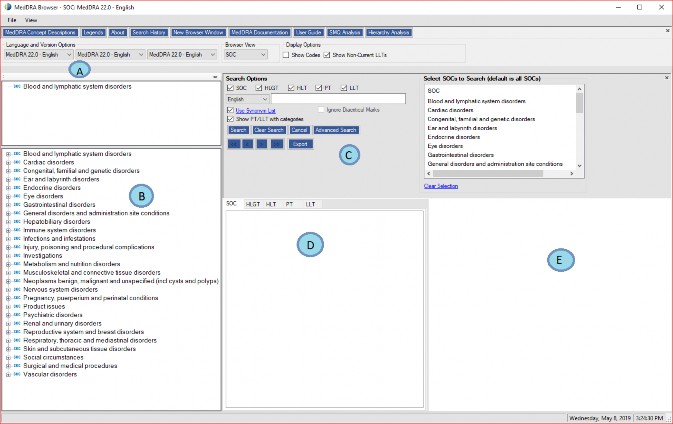
The sections below describe the five panels of the MDB.
At the top are MDB configuration options and useful information. These include the ability to change languages, MedDRA version, and switch between SOC and SMQ view.
To the left is the MedDRA hierarchy panel where one can browse the hierarchy by left clicking the plus symbol next to each term to drill down to the LLT level.
Just above the MedDRA hierarchy panel is the Term Navigation panel, which displays hierarchy information and reduces the need to scroll up to recall which SOC or HLGT you are browsing in.
![]()
In the middle is the search panel where words or MedDRA codes may be entered to search for MedDRA terms.
The bottom / middle is where the search results are displayed
To the right is term detail information. When clicking on a MedDRA term in the hierarchy panel (B) or in search results (D), the term details display in this far right panel.
The MDB configuration and information options are shown below.

links to the current list of concept descriptions as found in Appendix B of the MedDRA Introductory Guide.
an explanation of the color codes used to convey hierarchical link information or term status in both the SOC view and the SMQ view
name, version, and copyright information
retrieve the history a term by entering into the field provided
opens a new browser window, which is useful for comparing two different versions of MedDRA
![]()
links to MedDRA Release support documentation found on the MedDRA website
links to this document
provides views of up to three supported languages simultaneously
default will show the SOC view of MedDRA; SMQ view displays the SMQ information in the hierarchy panel on the left
Show Codes displays the MedDRA code next to each term
By default, the MDB will show non-current LLTs, which are depicted with a red square and lettering.
*Note: An Internet connection is needed to access the MedDRA concept descriptions, documentation, and the user guide.
![]()
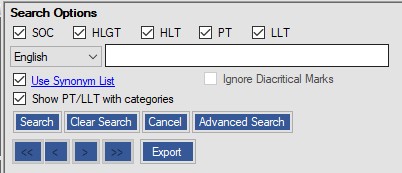
This section describes how to perform searches in the MDB, and explains the search functions in the search panel.
To search, enter a term or word in the Search field (C).
The search function performs a logical and operation and return terms with those words found in any order.
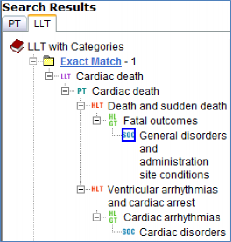
When results are returned, a summary of the search results appears (D) showing the total number of terms returned and a hierarchical breakdown of results – for example how many LLTs, PTs, HLTs, etc.
Similarly, the results are divided into separate tabs according to their place in the MedDRA headachy. – LLT, PT, HLT, etc.
LLTs will show first if there are any in a search result.
![]()
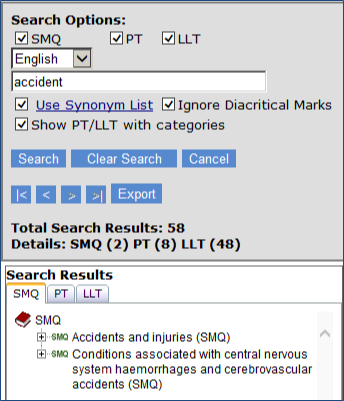
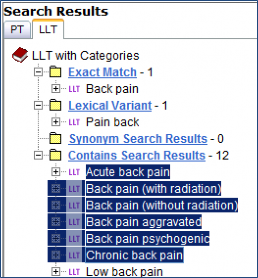
By default, a search will break up returned results into four search categories at the PT and LLT level.
To perform a complex search, click on the “Advanced Search” button and then select the preferred grouping and Boolean operators.
To revert back to simple searches, click on the “Basic Search” button.
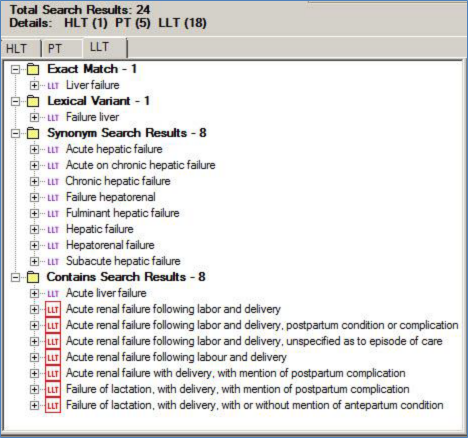
Exact match – result matches exactly what was typed into the search field
Lexical variant – returns different word order of words typed into the search field. In the example above a search for “liver failure” returned the lexical variant “failure liver”.
Synonym search results – return results based on the associated synonym list file. Notice the search for liver failure returned terms that contain hepatic in them.
o Synonyms are returned based on predefined synonym groups that may be viewed by clicking the “Use Synonym List” link found in the search panel (C).
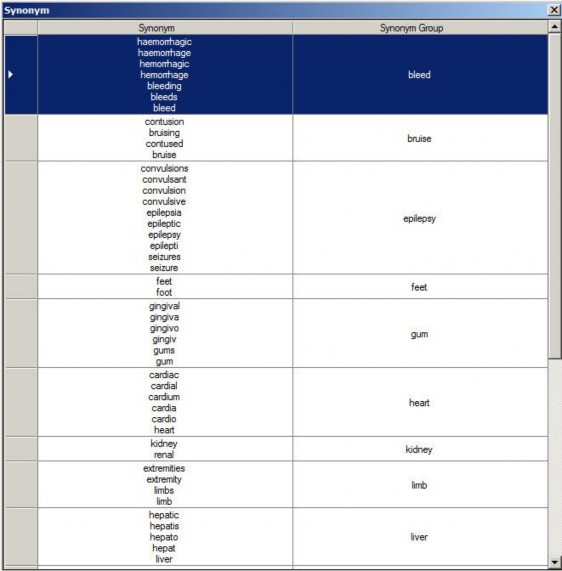
These pairings have been tested to ensure they bring up appropriate associations. For example, “liver” terms return “hepatic”; “kidney terms” return “renal terms”; and vice versa.
The synonym search function may be disabled by unchecking the check box to the left of “Use Synonym List.”
Contains search results – terms that contain word or words entered in the search field.
If you prefer to not group research results according to the search categories, this function may be disabled by unchecking “Show PT/LLT with categories” option which will return results in alphabetical order.
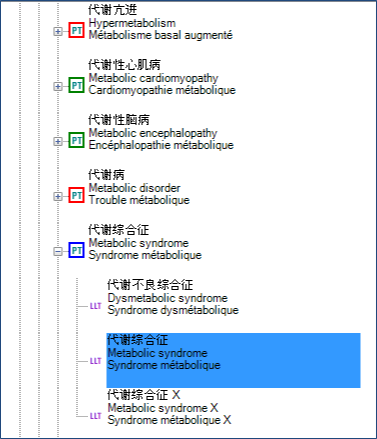
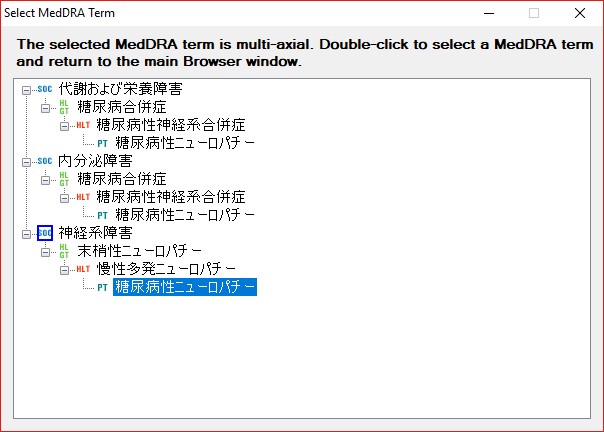
To view the hierarchy of higher level terms and multi-axial links, expand the search results. The primary SOC is designated with a blue square.
The “Go to Browser” function shows the user the exact place in the MedDRA hierarchy a term resides. To use this feature, right click on a term in the search results panel (e.g., PT Cardiac death) and choose “go to browser.” A second browser window pops up displaying the hierarchy information.
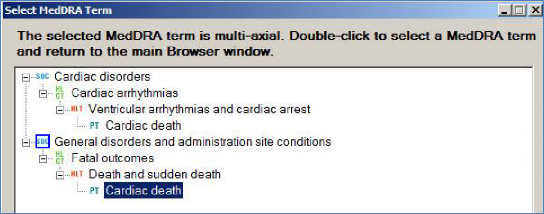
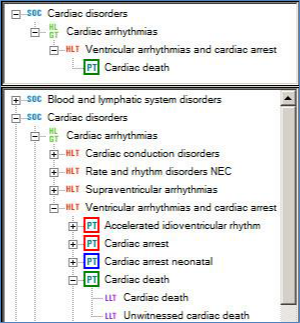
In this case there are two links – a primary link to SOC General disorders and administration site conditions which is designated by the blue box surrounding the “SOC” icon, and a secondary link to SOC Cardiac disorders. To see a specific link, click on the term name to go to that area within the MedDRA hierarchy.
For example, to see the secondary link in the MedDRA hierarchy, double click on the PT Cardiac death in the secondary link to see the surrounding LLTs and PTs.
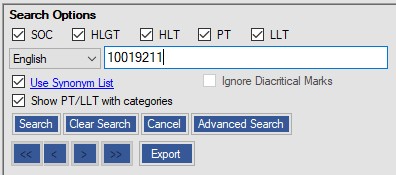
In addition to words, one may also enter a MedDRA code in the search field to search by code.
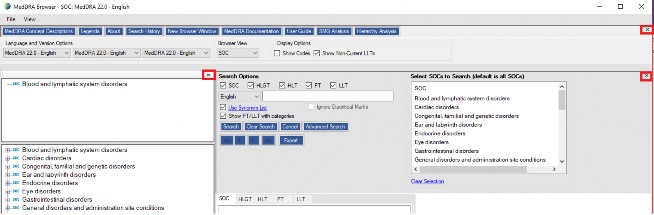
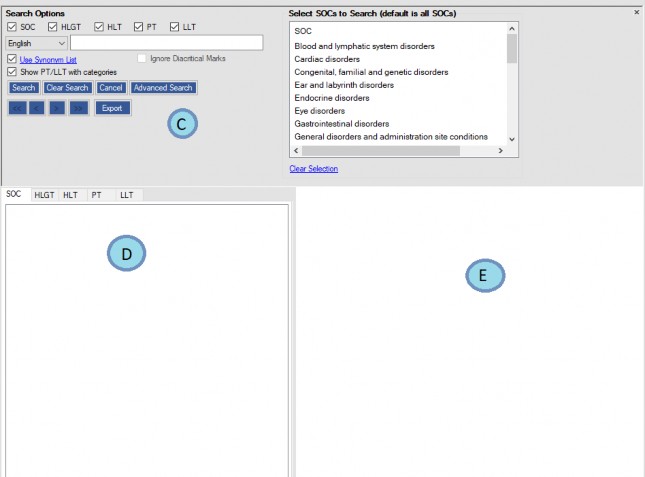
To limit which SOCs to search from, select one or more SOC(s) from the “Select SOCs to search” window. For example, if you were interested in investigation terms and did not want terms from other SOCs, select the Investigation SOC to limit searches to this single SOC.
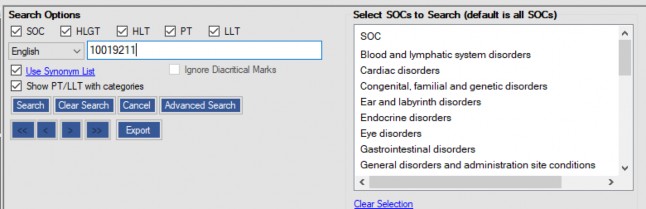
Multiple groups of SOCs can be selected by holding down the shift key and clicking on SOC names.
Individual SOCs can be selected by holding down the CTRL key to multi-select those SOCs to be included in the search.
Notice that when a search is limited to a subset of the SOCs, there is a yellow highlighted message informing the user of the number of SOCs selected.
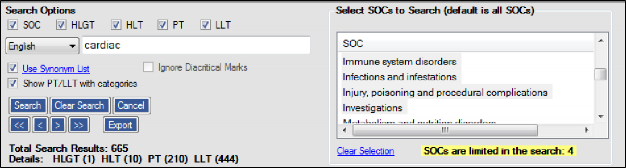
To search all SOCs again, click the “Clear Selection” button.
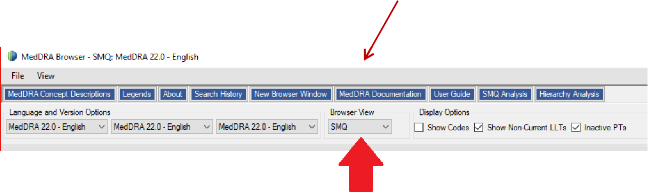
Performing searches for SMQs is similar to performing searches in the SOC view. First switch the browser view to SMQ view.
Enter a word or words to search in the search field.
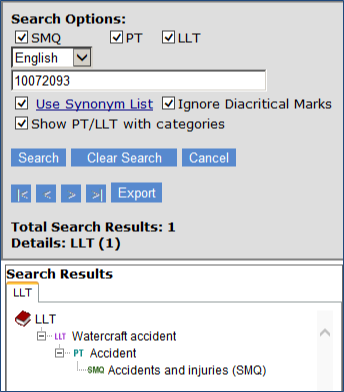
As explained in the SOC view examples above, one can search for MedDRA term codes and - specific to the SMQ view – SMQ codes may be entered for searching.
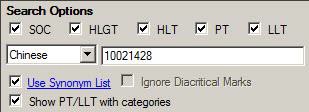
Enter the SMQ code in the Search Options screen and press Search.
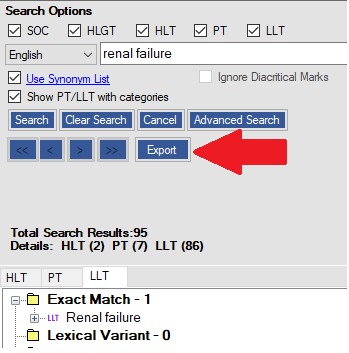
In addition to the above search functions, there are additional search features available in the MDB.
To export all search results to a spreadsheet, after performing a search, click on “Export” in the Search Options screen.
A popup window appears displaying the search results. Primary SOC hierarchical information is included by default. Options to include secondary SOC and HLGT and HLT information are available. To exclude secondary SOC or the higher level terms uncheck these options. Click “Export” to export to a spreadsheet. Note that MS Excel or compatible spreadsheet software must be installed on your computer for this feature to work.
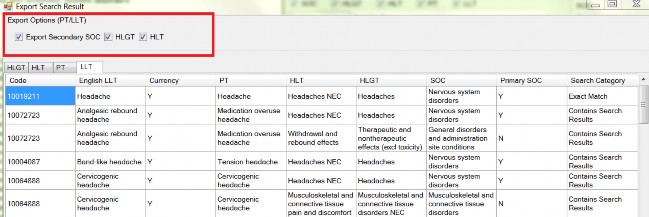
To limit the export to only a subset of search terms, please refer to Section 6.4 RESEARCH BIN and Section 6.5 EXPORT RESEARCH BIN TO SPREADSHEET.
The MDB has the capability of searching in three supported languages. From the Configuration options fields, choose up to three languages. To search or view two languages only, simply make two of the three language choices the same. In the example below, three languages have been selected in the following order: Chinese, English, and French. The selected languages will appear in the hierarchy panel in the order which they have been selected.
The left most language selected is considered the primary language which means that information options used in the MDB will be presented in this language such as term detail information, term history, copy term, and the MedDRA concept descriptions.
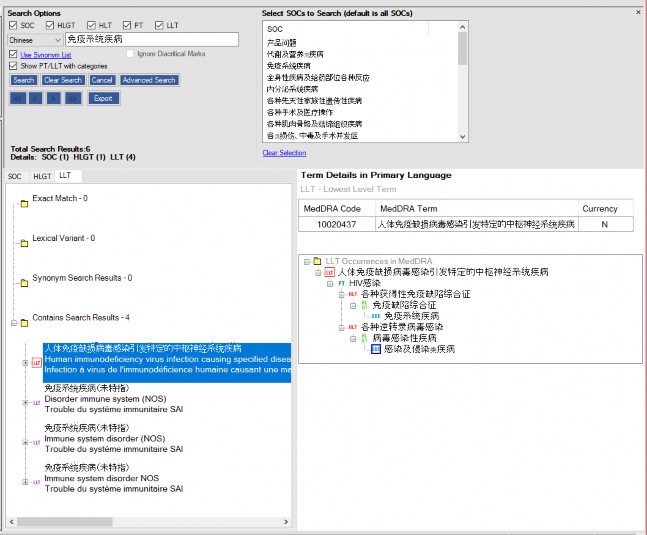
One can see what language the browser is set to search by looking to the left of the search field. Type in a Chinese word to search (免疫系统疾病). The search returns
items with the Chinese words. Because English and French were also selected, the corresponding English and French terms appear below the Chinese terms in the search results panel.
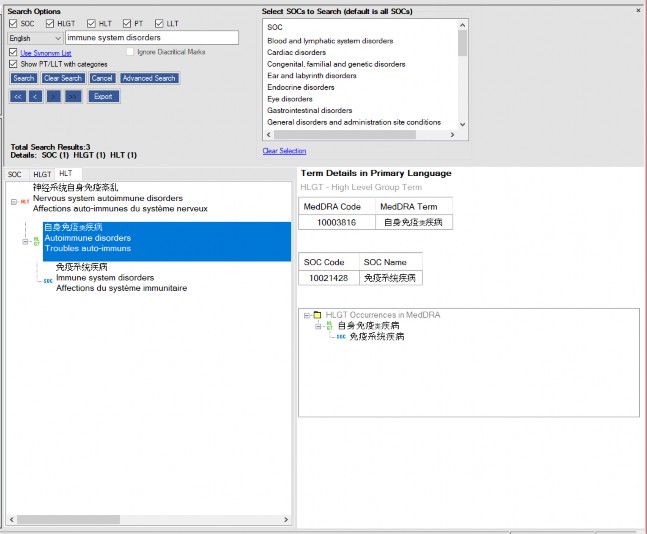
The language to search can be changed by using the drop down menu to the left of the search field. Only the languages selected in the language options menu will appear. In the example below, the search language was changed to English.
Notice that the corresponding Chinese and French term names appear in the search results and the Term Details in Primary Language pane shows term detail information in Chinese.
There is an associated synonym list for each of the supported languages. To view this list, click on the “Use Synonym List” link in the search panel.
To view a list to a specific language, that language must be the primary language selected.
![]()
A popup screen appears with the synonym list for the selected language.
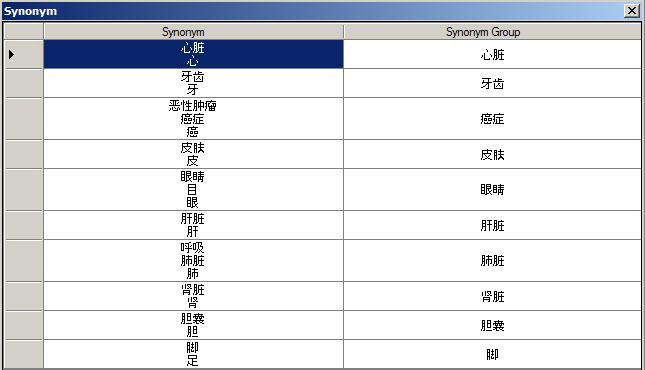
The synonym search function can be disabled by unchecking the “Use Synonym List” feature.
By default, the “ignore didactical marks” option is enabled for searching. This means that diacritical marks such as accents, tildes, and umlauts used in non-English Latin alphabet languages are ignored when performing a search. This alleviates the user from having to remember the correct diacritical marks for words.
“Ignore diacritical marks” can be disabled by unchecking this option:
![]()
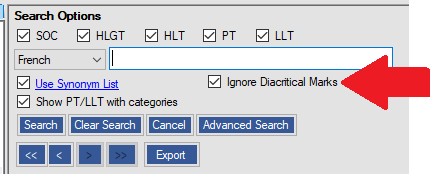
“Ignore diacritical marks” is also disabled for Asian languages.
The arrow icons below the search button provide a way to go back or forward through searches performed.
![]()
For example, clicking on the left < arrow goes back to the previous word or words searched. The right > arrow moves one search forward within the set of terms searched.
The outside arrows go to the very first term searched or to the last term searched.
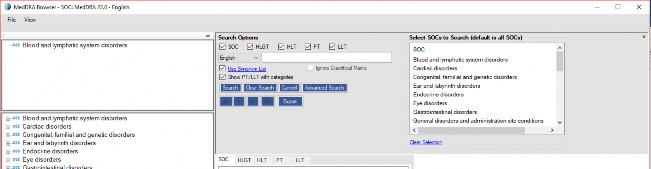
To clear the search results panel and the search field, press the “Clear Search” button.
![]()
To stop a search in progress, press the “Cancel” button
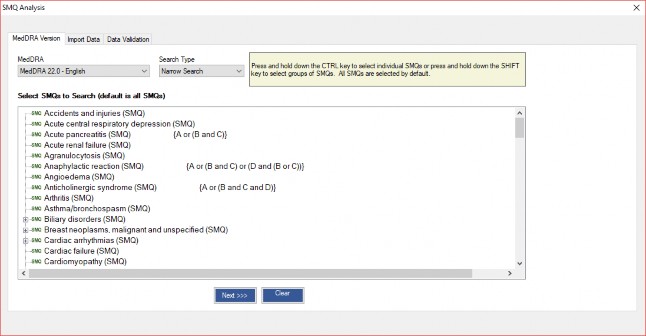
This function allows user to assess MedDRA coded data against SMQs to identify “hits” or matches for the purposes of performing analysis. To perform this analysis, you will first need to select language/MedDRA version, and search type (narrow, broad, and algorithmic).
![]()
Please see the latest version of the SMQ Introductory Guide for explanations of narrow, broad, and algorithmic searches.
By default all SMQs are applied in the search, however, individual SMQs may be selected by pressing and holding down the CTRL key or groups of SMQs may be selected by holding down the SHIFT key.
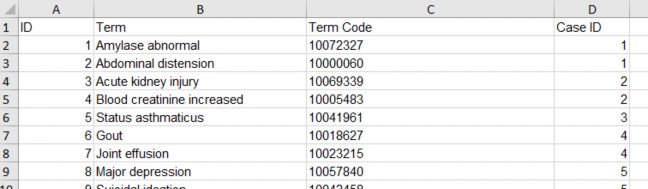
Once the language / version, search type have been selected, click “Next” to import the spreadsheet of MedDRA terms.
Data must be in a Microsoft Office Excel or compatible spreadsheet with the first row containing the column headers and with data starting on the second row. Four columns are required in the following order (Row ID, LLT/PT Term, LLT/PT Code, Case ID). The Row ID value is optional (note the row ID column is required). Either the LLT/PT Term or LLT/PT Code must be provided for English language data. For non-English language data, both LLT/PT Term and the LLT/PT Code must be provided. The Case ID is optional but must be used if you are performing an Algorithmic Search against the algorithmic SMQs in MedDRA.
![]()
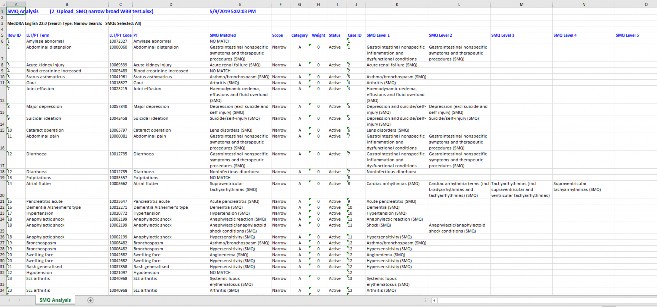
After generating the report, you can export it to a spreadsheet.
The report shows which terms in your spreadsheet are in the SMQs that were selected for analysis. Terms that are not in any of the selected SMQ are labeled with “No Match”. For Hierarchical SMQs, the hierarchy information is shown in the right most columns.
![]()
This function lets you retrieve the MedDRA hierarchy of multiple terms uploaded at one time and optionally includes the secondary SOC path. To perform this analysis, you must first select the language and MedDRA version. Then determine if you wish to include secondary SOC information, the HLGT and HLT hierarchy in your export. If you wish to exclude this information, simply uncheck these options before continuing. Users may also opt to include MedDRA codes for all levels of the hierarchy exported.

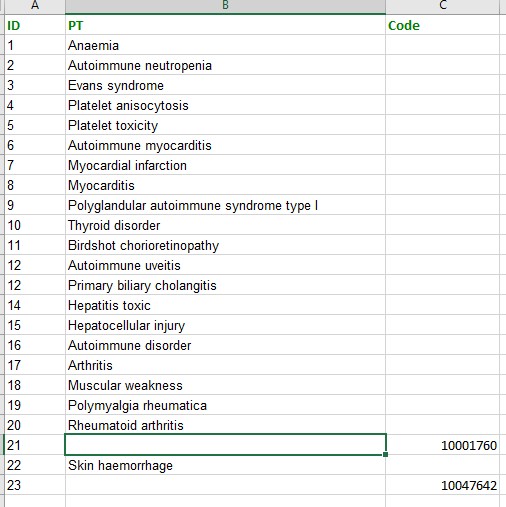
Next, import the spreadsheet with the desired MedDRA terms. Data must be in a Microsoft Office Excel or compatible spreadsheet with the first row containing the column headers and with data starting on the second row. Three columns are required in the following order (Row ID, Term, Code). The Row ID value is optional (note the row ID column is required). Either the Term or Code must be provided for English. In non-English data, both Term and Code must be provided.
After generating the report, you can export it to a spreadsheet for further analysis.

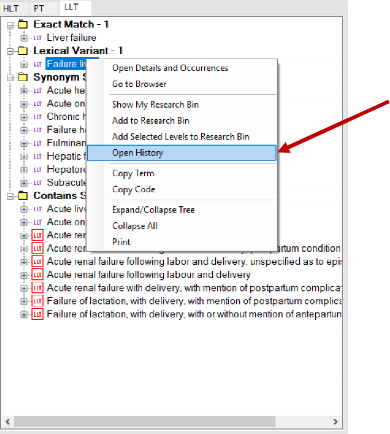
To view basic historical information about a MedDRA term, right click on the term in either the search results panel or the hierarchy panel and select “Open History.”
![]()
A history window will appear showing basic history information for the selected term:
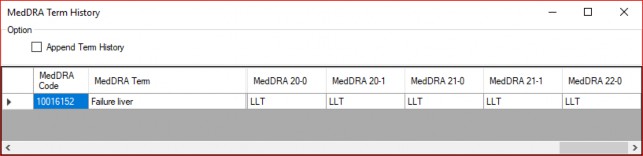
History information is available in each of the supported languages. History information for non-English languages begins when that language was introduced (supported) into MedDRA.
To copy a term name or MedDRA code into the computer’s clipboard for pasting in a document, right click a term in either the search results panel or the hierarchy panel and select either “Copy Term” to copy the term name, or “Copy Code” to copy the MedDRA code.
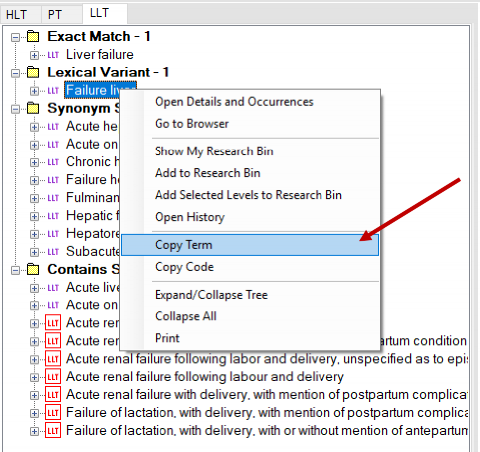
The term name or term code can be pasted into another document such as a word document.
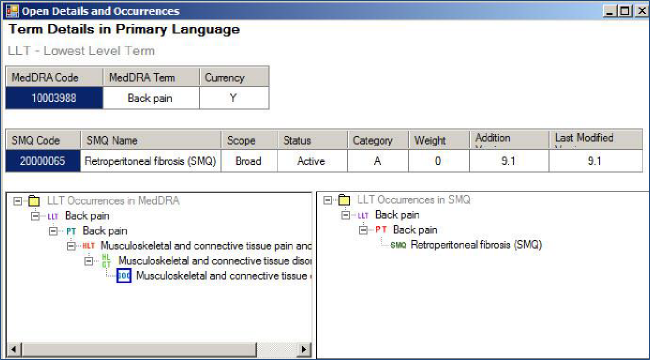
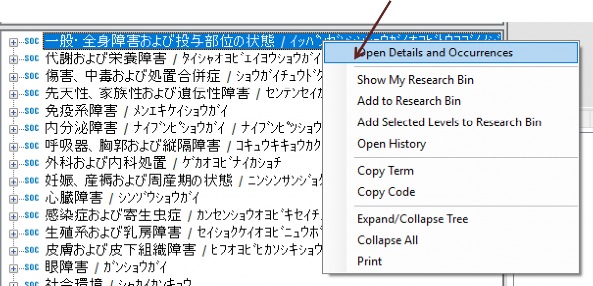
To view open details and occurrences of a term, right click on the term in either the search results panel or the hierarchy panel and select “Open Details and Occurrences.”
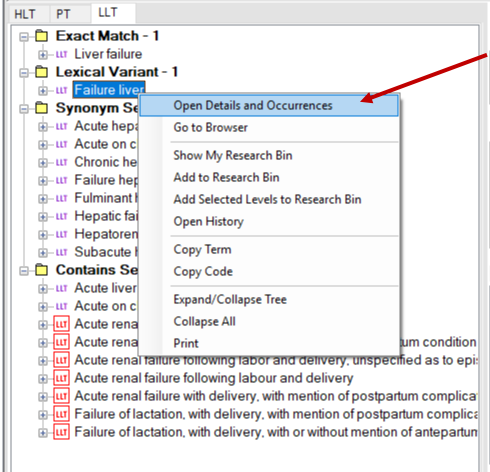
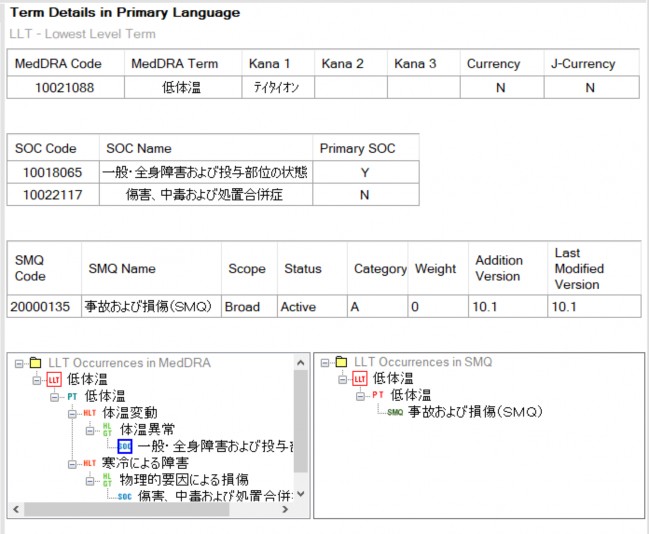
A details and occurrences window will appear showing similar information as shown in the term details panel on the lower right of the MDB, including term occurrences in MedDRA hierarchy and placement in SMQs.
The research bin collects and stores terms during an MDB session for research purposes.
To add term to the research bin, right click on a term and press “Add to Research Bin.”
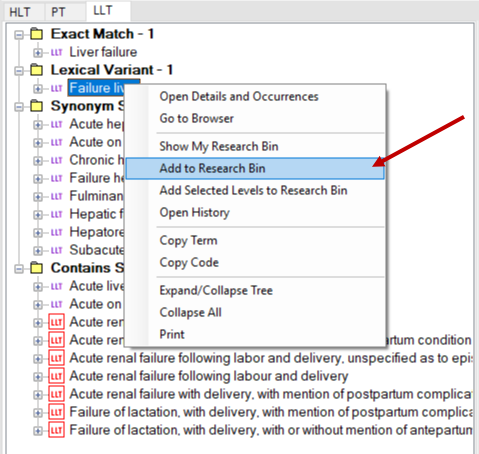
Multiple groups of sequential terms can be added to the research bin by selecting and holding down the shift key and clicking on term names.
![]()
Multiple non-sequential terms can be added to the research bin by holding down the
Individual terms in the research bin may be removed by checking the box in the “Remove” column and selecting “Remove” at the bottom of the research bin:
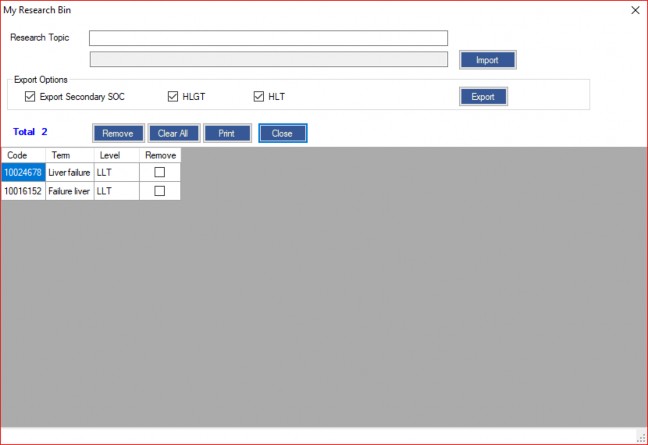
The entire research bin contents may be removed by clicking “Clear All.”
A term and some subordinate terms may be added at one time by right clicking on a term and selecting “Add Selected Levels to Research Bin.”
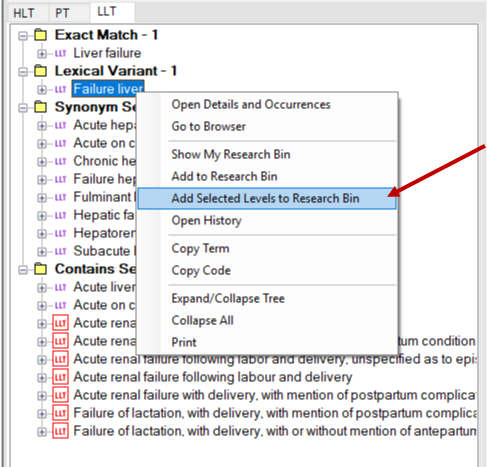
Then, continue by selecting which levels of the hierarchy need to be added. The research bin is displayed.
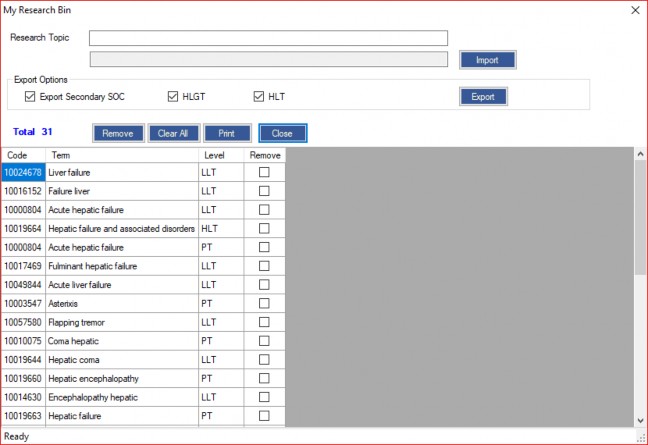
Before exporting the research bin to a spreadsheet, there is an option to label the research bin. For example, enter a topic name in the “My Topic” field above and click on “Export.” Then determine if you wish to include secondary SOC information and the HLGT and HLT levels of the MedDRA headachy. If you do not want to include this information, unselect these options before exporting.
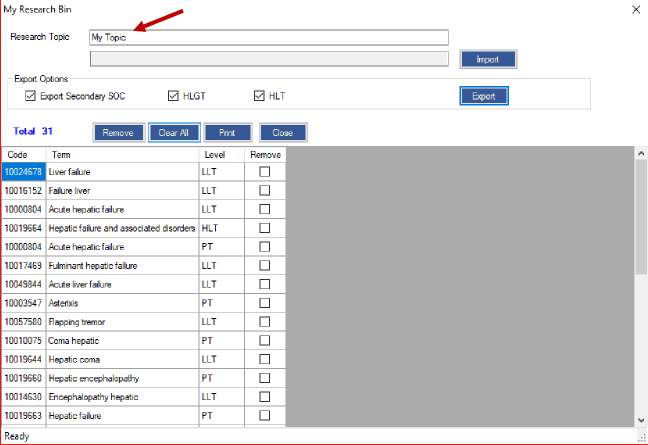
Included in the export spreadsheet are the topic name, if entered, a date/time stamp, and the term names, levels and SOC hierarchy information.
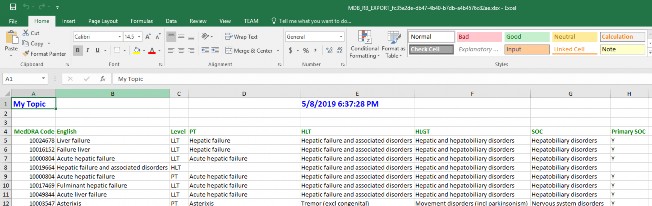
![]()
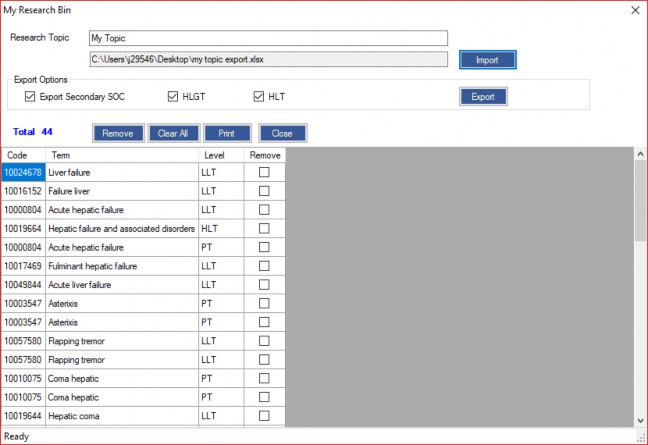
To import a previously exported research bin, press the “Import” button to find the spreadsheet on your local computer or local network and select it.
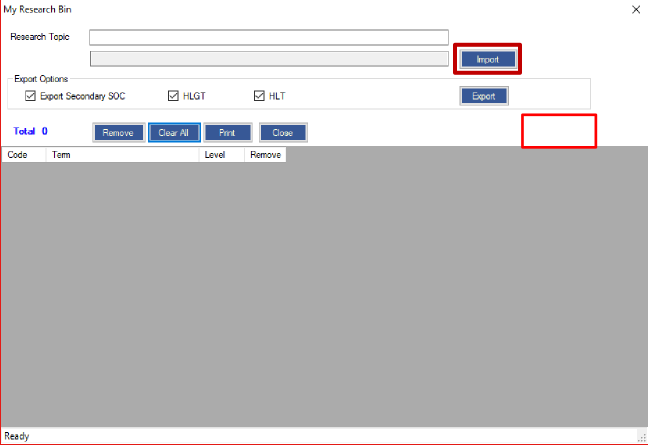
Results:
MDB can only export and import the Research Bin the Microsoft 97-2003 XLS format.
To export an SMQ and its related PTs to a spreadsheet, select SMQ view. Right click on an SMQ and select “Export SMQ.”
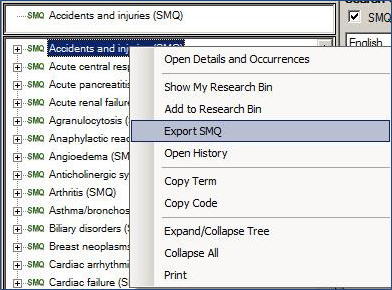
You will be presented with a popup window asking if you want to include inactive PTs.
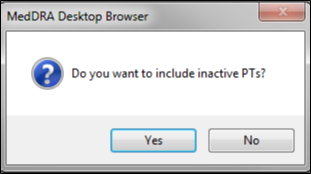
Press “Yes” if you wish to include inactive PTs; otherwise click “No” to export the contents of an SMQ to a spreadsheet. You will be presented with the SMQ Export spreadsheet.

Notice that the contents of the SMQ, including the SMQ name, PTs, and PT scope are included. The yellow highlighted rows are inactive PTs. Remember inactive PTs would only be included in an export if you clicked “Yes” in the popup screen to include them.
While the concept and contents of the Japanese version of MedDRA are exactly the same for English as they are in all of the other supported languages, there are some unique features in the Japanese translation of MedDRA due to language, culture, and medical practice.
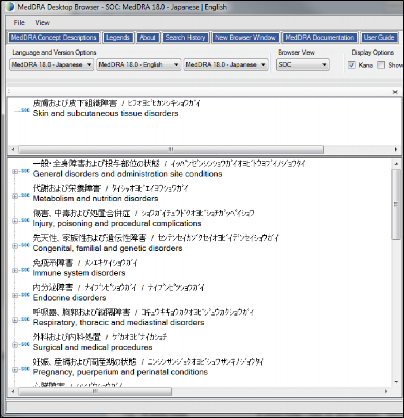
To use the Japanese MedDRA features in the MDB, Japanese must be set to the primary language. Select “SOC View.”

The Japanese version of MedDRA contains a translation for both Kanji and Kana. Kanji is the written form of Japanese displayed in the hierarchy view and term detail information. The Kana translation is used to help the reader of Japanese know how to pronounce the Kanji term, and is provided for current LLTs and higher level terms – PT, HLT, etc.
To see the Kana translation of the Kanji terms in the hierarchy panel, click the “Kana” checkbox in the configuration options panel.

Notice that the Kana translation appears to the right of the Kanji translation separated by a slash.
Additionally, the Kana translation is always displayed in the term details information found in the term details panel and the “Open details and Occurrences” right click option.
![]()
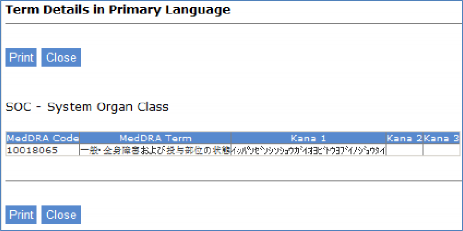
In the Japanese translation of MedDRA, there is an additional currency flag for LLTs to address instances when two or more English LLTs are translated to the same Japanese term. Japanese MedDRA currency – called J-currency – ensures the uniqueness of Japanese MedDRA terms by flagging only one of the duplicated translations for current use.
The MDB supports several methods to identify the J-currency status of LLTs.
When browsing the MedDRA hierarchy at the LLT level, English text to the right of an LLT separated by parentheses indicates a term that has been set to J non- current status (Jcurr:N)).
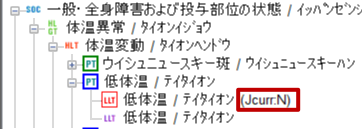
Click on the LLT and refer to the Term detail panel.
Note the J-currency flag is set to “No.” The same information appears in the Open Details and Occurrences popup.
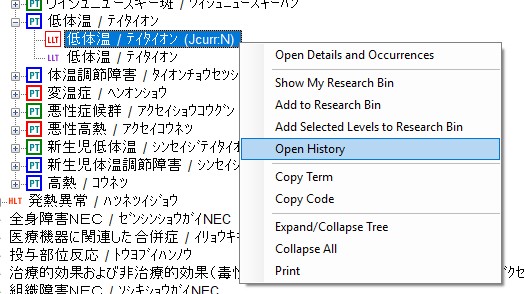
Right click on the term and select “Open Details and Occurrences.”
To view changes to the J-currency status, right click on the term and select “Open History.”

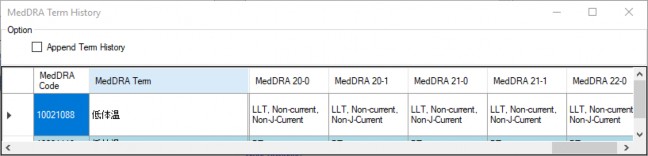
Notice both LLT currency and the J-currency information are indicated.
To address some of the linguistic challenges described earlier, the Japanese Maintenance Organization distributes a Japanese synonym file for each MedDRA Japanese translation release. This synonym file is different than the synonym search function explained in the MDB search section, which applies to English and the other supported languages.
The Japanese Maintenance Organization distributes the synonym file (called LLT_SYN.asc) one month after the release of MedDRA/J. To install the
![]()
LLT_SYN.asc file, it must be included in the same folder from which MedDRA/J is loaded into the MDB. If you have installed MedDRA/J before the synonym file was released you will be required to uninstall MedDRA/J files from the MDB and reload them with the synonym file included in the folder with the rest of the MedDRA/J files.
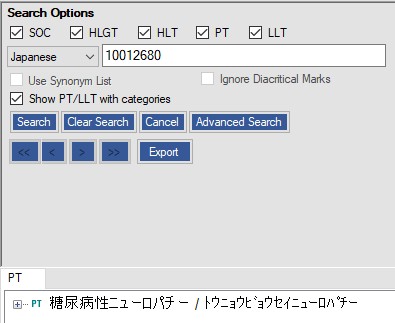
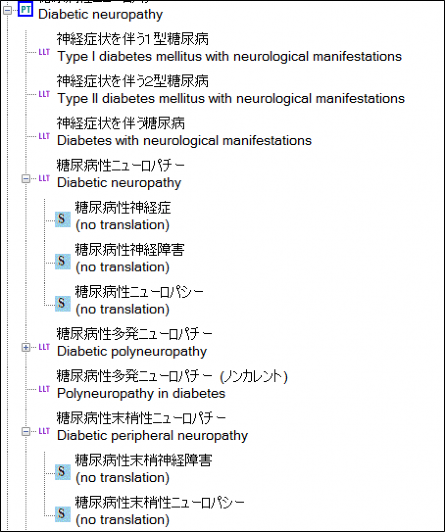
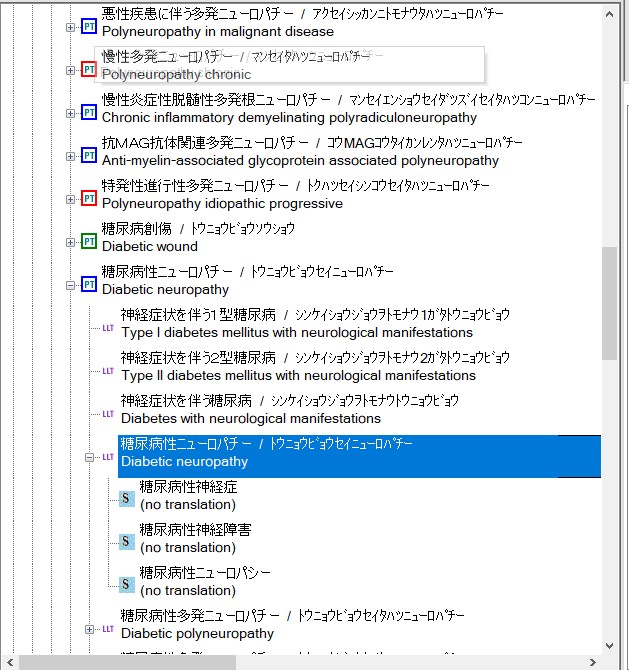
To view the Japanese synonym for an LLT, search for a term.
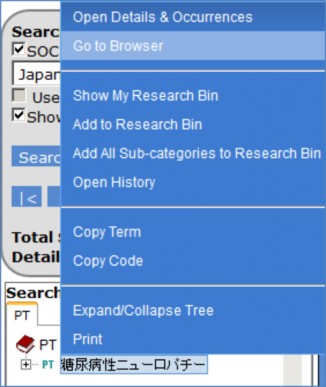
Right click on the term and select “Go to Browser.”
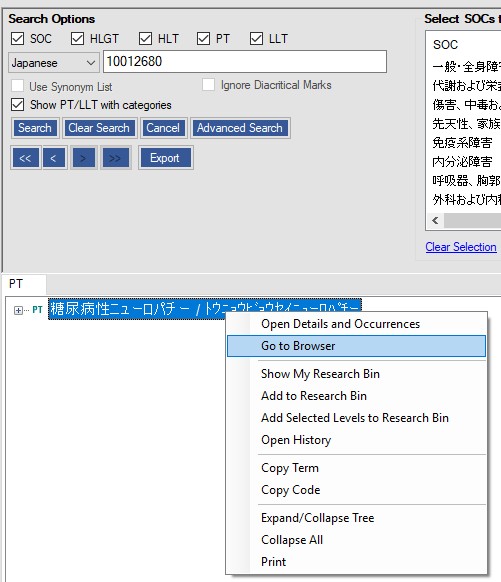
The synonyms appear below the LLT level in the hierarchy view:
In addition to the other color code explanations, the J-currency and Japanese synonym list identifiers are presented in the legend to help users remember what these symbols mean. They appear in both SOC and SMQ legends.
![]()
To view the J-currency and Japanese synonym list identifiers, click on “Legends” at the top of the screen.
This form provides you with the tool to identify and communicate issues or development ideas for the MedDRA Desktop Browser to the Maintenance and Support Services Organization (MSSO). It is divided into two sections. The first section should be used to identify software “bugs” or errors. The second section should be used to propose enhancements of existing capabilities or to propose new capabilities. Please use the correct section for your feedback.
Please use the following format to record any software glitches or errors that you may have encountered while using the MedDRA Desktop Browser:
Screen or function where glitch/error/“bug” occurred (e.g., screen name): Description of cause of error:
Result of error:
Attachments to clarify the above (e.g., screen shots, notes):
Please use the following to submit suggested enhancements to the MedDRA Desktop Browser:
Capability proposed:
Location(s) available for capability within MedDRA Desktop Browser (e.g., menu item, short-cut icon):
Attachments (e.g., proposed layout, notes):
![]()